Welcome back to our series on wildlife photography, “Through the Lens with Nick Leadley.” A professional wildlife photographer and Maine Guide, Nick is writing about a different aspect of wildlife photography each month to help you improve your skills and capture the best images of birds and nature. Enjoy!
I always enjoy figuring out how to design and create things. Maybe that’s why I am a photographer. This month’s installment of Through The Lens is about how to make a homemade ground plate.
“What is a ground plate?” It is a device that allows you to mount a camera just above ground level and is extremely useful when photographing birds and mammals from a low and unobtrusive viewpoint. Shooting from eye-level creates intimacy with the subject by getting down to their perspective, and using a ground plate can result in backgrounds not available when shooting from higher angles. Options for getting to ground level, however, can be somewhat uncomfortable. Many a wildlife photographer has grass or dirt stains from lying on their belly to get a low-angle shot! One option to protect your clothes (somewhat, at least) but still get the shot is to build a ground plate.
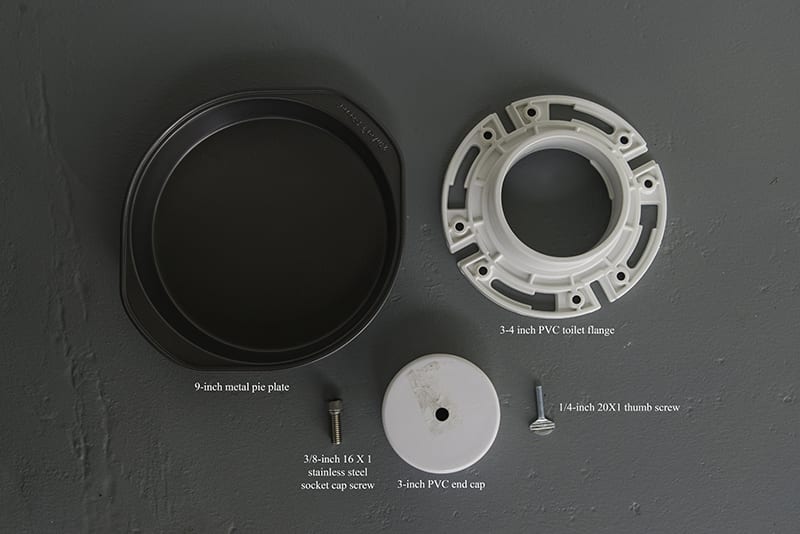
So, let’s get started. Here is what you will need:
1. A standard nine-inch metal pie plate
2. Flush fit PVC 3 to 4-inch toilet flange
3. Three-inch PVC cap (make sure it has a flat top)
4. One 3/8 inch -16X1 stainless steel socket head cap screw
5. One ¼ inch – 20X1 thumb screw
6. One can of Rust-Oleum Corrosion Resistant Undercoating
7. JB Weld two-part epoxy
Here are the steps to create the ground plate.
- Sand the outer surface of the PVC end cap until smooth. You will need to remove enough material so the end cap can be inserted and removed from the flange easily. I used a Dremel tool to start and 320 grit sandpaper to finish.
- Insert the end cap into the flange. Drill a ¼-inch hole through the side flange and end cap. Drill a centered 3/8-inch hole in the top of the end cap.
- Sand the edges, bottom, and inside of the pie plate with 60 grit sandpaper to remove as much of the smooth finish as possible. Do the same to the top of the end cap.
- Mix the JB Weld epoxy and thoroughly coat the bottom of the toilet flange. Press the flange against the bottom of the pie plate and allow the epoxy to dry.
- Once the epoxy is dry, paint the inside and outside of the pie plate/flange combo with white Rust-Oleum Clean Metal Primer. Be careful not to get and paint inside the flange. Do the same to the end cap. Apply a second coat of primer when first is dry.
- Once the paint is dry, attach a tripod head or your lens foot plate onto the end cap using the cap screw. Tighten as much as needed with an Allen wrench.
- Insert the end cap into the flange and insert the thumb screw into the ¼ inch hole.
Here’s how the plate will look when finished.
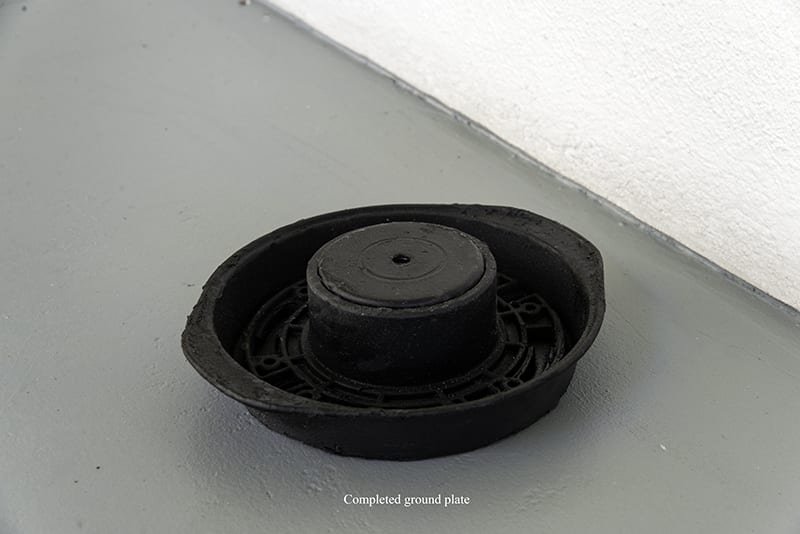

The total time to put the ground plate flange together, not counting the necessary drying time for epoxy and paint, came to 90 minutes. All told within 48 hours the ground plate was ready to use. And the total cost in materials purchased came to $13.72, not including the Rust-Oleum and JB Weld which I had on hand from other projects.
You’re now ready to start shooting at ground level. The ground plate is designed so you can slide it along the ground or sand to approach your subject in a less intrusive manner. Have fun!
If you try making a homemade ground plate and run into any problems, please get in touch through my website at www.touchthewildphotos.com. And if you have any suggestions on a way to make the homemade ground plate better, I look forward to hearing them.